Contents
- Plan It Out!
- Drawing a Figure with Clothes and Realistic Folds
- ‘Medieval’ Like Armor
- Recommended Books
- Dynamic Wrinkles and Drapery: Solutions for Drawing the Clothed Figure (Practical Art Books) by Burne Hogarth
- Drawing People: How to Portray the Clothed Figure by Barbara Bradley
- Wreaking Havoc: How To Create Fantasy Warriors And Wicked Weapons by Jim Pavelec, Chuck Lukacs, Thomas Manning & Christopher Seaman
In order to draw clothing on comic characters a certain amount of thought is necessary before picking up your drawing pencil. Becoming familiar with styles that change each decade requires you to decide what era your characters are representing. The country, time period, royal or casual dress and action of your character all need to be considered in order to make your character as life like as possible.
In learning how to draw clothing on a repeating cartoon character, consider the dress in addition to the facial and body shapes and expressions. A teen can be symbolized with blue jeans and a tee shirt that will hold throughout many decades. Capes or baseball caps can individualize your character more. Perhaps a different time period with good guys and bad guys need the help of something more mesmerizing. A coat of armor can lend relevance to a medieval period where swords and chains were used in wars.
Plan It Out!
Having an objective or goal on what you want to achieve can really help you in drawing clothing for a character. Instead of deciding on what your character should wear as you sketch can lead to making corrections or erasing and can stray you away from achieving what you want.
Write down on a notepad or sketchbook on what you want your character to wear and how you want him/her to look similar to a character creation/design template. Here’s a short example-
Name – John Adams
Age – Mid 30’s
Description – Lean muscular fit. Almost military like with strong arms and chest.
Attire – Cargo pants with boot/army boots. long sleeve shirt with sleeves rolled up just below the elbow. Belt and gun holster strap to chest or thigh.
With this you get to visualize your character and how he/she would look like, and try to sketch it as close to what you want your character to be. It would be a lot easier because you already know how you want your character to look like.
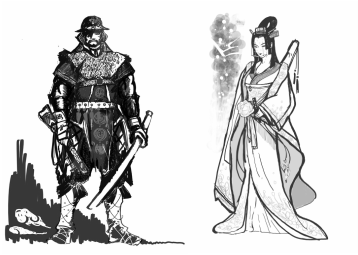
Drawing a Figure with Clothes and Realistic Folds
Assume your character is a female and standing sideways, elbow slightly bent, as if speaking to someone. Your objective is to place a full skirt that falls just below the knees and a long sleeved blouse on the figure.
Step 1
Begin with the blouse by making tubular lines on the arms as the beginning of the sleeves. The body part of the shirt can hug the body as color, shading and folds will bring out the shape.
Step 2
Outline the gathered skirt in a fullness that you wish. Using a column fold, begin at the waist and bring down one cylindrical shape for each pleat. You can have a few or many depending on the fullness of the skirt. For a straight skirt, two to four are plenty.
Step 3
Work the cylinders with a hard edge followed by a parallel line of reflected light, a shadowed edge then a soft edge. This step requires much practice and a picture where these lines and shadows are obvious when you understand the concept.
Step 4
Go back to the top and using a drape fold, draw long alternating narrow dark and light semi-circular strips down the front, sides and back. Shading will accentuate the areas according to the direction and light source.
Step 5
The coil fold is a good way to form the folds in the arm of the blouse. Picture a piece of fabric wrapped around a rod and you get the point. A sleeve will not be straight but wrapped around the arm in creases in a spiral-like appearance. Practice on your coils and it will begin to pay off in a perfect sleeve.
If your figure is sitting down, the inert fold comes into play with folds that go in different directions. Part of the skirt will be gathered beneath the subject and a consistent relative to the next can be used. An interlocking fold is the observance of a piece of fabric wrapped around a neck or piled on the floor. Multiple folds that are layered over one another is the idea behind the inert fold.
Study a drawing with this type of fold to really get the feel for a consistency of the gatherings.
‘Medieval’ Like Armor
There is a lot of armor designs even modern ones that follows closely to that of the ‘medieval’ armor design. Drawing a medieval armor can actually be easier than drawing fabric where different types of creases are necessary to bring out the reality of how clothes fit the body but shading is the key. Locate a picture of a coat of armor and mold out these following pieces that surround the frame.
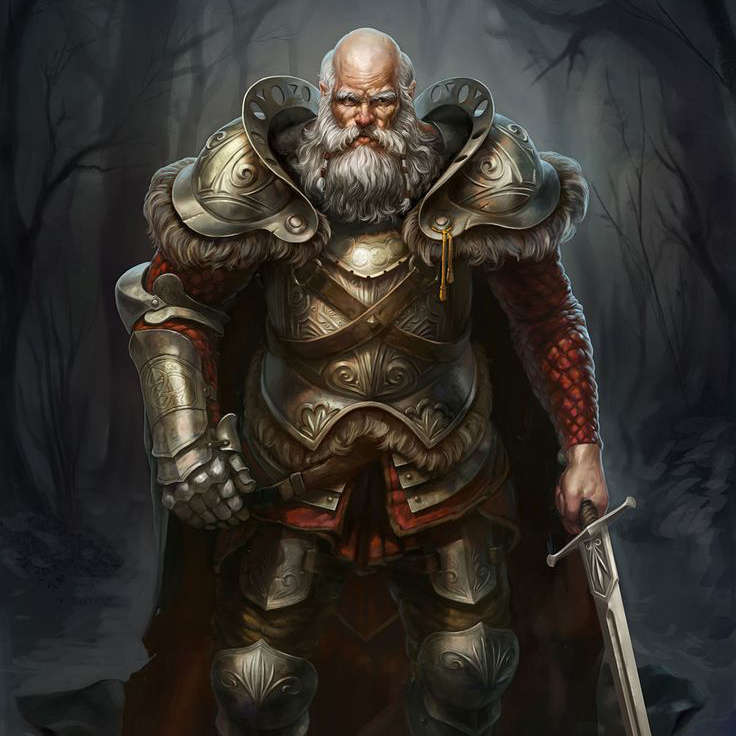
The Helmet
Constructing a helmet over the head should remind you of a basketball with an open space for the face. A metal visor that moves up to the top of the head then down during battle allows you to draw the visor in any position you want. This is the most interesting part of the armor because the helmet is where the identity or the signature of a certain character can be made. Popular ideas include a helmet with a visor like attribute where the visor shows a face of a man or an animal similar to those worn by the Roman Gladiators and separate mask for the helmet which show the face of a demon of ghost as shown by the Japanese in it’s medieval era.
The Neck Guard / Gorget
This piece covers the neck area that is exposed from the helmet to the body armor. Since the neck requires movement,an area of the neck are exposed just enough for the head to move without restriction.Then an armor piece loosely fit the neck area, around the collar-bone area .It often has the appearance of a thick turtleneck sweater. How to draw metal fabric instead of cotton can be a challenge.
The Chest Plate
A front plate and a back plate that are slightly curved were buckled together at the sides. A chest plate might have different designs that stood for a particular kingdom. Modern armor usually uses the breastplate design similar to that of a bulletproof vest worn by the police and the military.
The Shoulder and Arm Pieces
Shoulder pads worn by athletes are made out of hard plastic but some medieval armor were made from all metal and most futuristic armor are made by some lightweight material with strong resistance to a reasonable amount of force. Sometimes attached to the arm pieces and sometimes separate, some were designed ‘L’ shaped and stuck out from the shoulders along the front, sides and back. The arm pieces traveled all the way to the wrist with several accordion shaped pieces fitted around the outer elbow to allow for movement.
Gloves, Leggings and Boots
Gloves are made for the protection of the hand and wrist. Some designs goes all the way to the forearm.
Most leggings design are made for the protection of mostly the legs (obvious) part, though some also include protection for the groin area. Note that some the use of legging implies a lot of movements and it is useful to add some realism to it by showing exposed area mostly on the knee part of the legs and some design show flexibility on the ankle part of the boot to decrease restriction.
You may think that drawing all of the interacting pieces of metal could be more difficult that a shirt and pants but with armor, you are working with many unmovable parts. Clothes move and breathe along with the body and creases are an important part of the drawing. There are four basic types of folds used in presenting movement in clothes that are used on a body frame. Watch how they are used in drawing clothes on your character.
Shadows, folds and light will bring life to clothing or a suit of armor when studied thoroughly and gain an understanding that lines are only the beginning to a realistic clothed figure. Once you understand these basics you will be ready to move on to more active figures.
Recommended Books
Dynamic Wrinkles and Drapery: Solutions for Drawing the Clothed Figure (Practical Art Books) by Burne Hogarth
Obviously, nothing can replace the old-fashioned method of going out and observing wrinkles as they appear in the real world. If that is your intention, this book can help tremendously by giving you a clue on what to look for as you’re studying cloth. Also, this book is fantastic for teaching you how wrinkles appear if you’ll be drawing from memory.Topics include drawing compression wrinkles, crossing wrinkles, flying wrinkles, swag and hanging wrinkles, bend wrinkles, passive, inert, and lying wrinkles,… as well as a section on understanding kinetic forces which may prove to be the most helpful to you.

Drawing People: How to Portray the Clothed Figure by Barbara Bradley
Not only is this book an invaluable guide to drawing the clothed figure, it is also one of the best books I’ve seen on drawing period. All of the important principles of drawing are in this book. These principles are clearly presented and well organized with a good mixture of easy to read text and beautiful illustrations. For clothed figure there is nothing else remotely comparable to it on the market. I am a college art instructor and often use this book to illustrate drawing lessons. The sections of the book on kinds of folds and how different clothing reacts to the moving figure are the best I have seen. Anyone, from novice to professional, who want to know more about basic drawing principles, how to draw the figure or the clothed figure should have this book in their library.
Wreaking Havoc: How To Create Fantasy Warriors And Wicked Weapons by Jim Pavelec, Chuck Lukacs, Thomas Manning & Christopher Seaman
Four successful artists in the gaming and illustration industry share their secrets on materials, methods and drawing and painting basics.This book includes 15 full-demonstrations teaching readers how to draw and paint their favorite fantasy warriors, 39 mini-demonstrations focusing on the offensive and defensive weaponry specific to each warrior and 10 full-spread battle scene paintings feature popular fantasy warriors in their native habitats.It also features a bonus gallery section with recent work from all four authors.
Submit your review | |