Using Stick Figures
Drawing with stick figures is an effective way to draw if you are new to drawing human figure in motion or action. Regardless of whether you are new to drawing the human figure or not, using stick figures as the form or basis of your figure proves to be an effective method of drawing proper body proportion. The stick figure technique helps you simplify the bone structure of the body and can add more versatility when drawing the human figure in action, which is essential in comic art. In this page, we will go through how to use stick figures in your drawing, and why we recommend this method. We also include some basic poses that is pretty common in today’s comics.
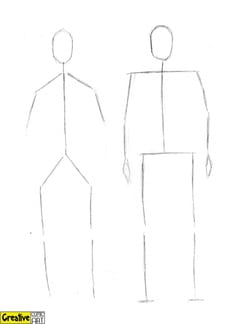
Notice the difference between the two picture (above). On your left is the original stick figure or the “hangman” stick figure, which is what most would think of when the word “stick figure” is mentioned. The picture on the right is how a stick figure (some called “stick mannequin” ) will look like when you draw them for comic art. It is quite similar to the “hangman” figure but with an added line for shoulder and pelvis line.With the stick figure, it is best to add upon or form shapes that represent major bone structures/muscles, which is a lot more easier to work with.
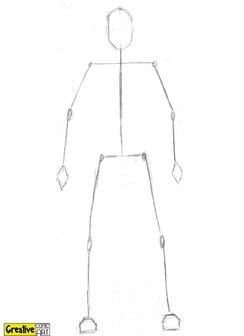
The idea in this method is to “build up” the figure with the stick figure acting as a frame. With circles representing the joints and facial features with either a cross or lines, the stick figure should be easy and quick to draw. Remember to draw the stick figures lightly(with light and thin strokes) as it will be easier to erase later. After you have finished drawing the basic stick figure form, you can start to add up simple shape to the stick figure form starting from top to bottom.Rectangle and square like shapes are great for the torso, neck and pelvis. Cylinder-like shapes is can be used for longer parts of the body like arms and legs.
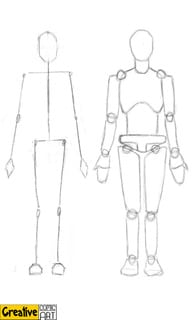
After you are done with the shapes, you can see that you have roughly made a basic “mannequin” figure just by adding form to the stick figures.The male and female human figure have different proportion and features. It is vital that you understand the difference between the two to avoid confusion and mistakes in your drawing. Find out more about more about the male/female difference HERE.
Once it is finished,you can start to include aspect of the clothing or costume to your character.In this case it is a costume.Costumes are easier to draw when compared to normal clothing/attire mainly because most costumes are tight fitting which has less fold or creases.For more on clothing and armor click HERE.
Almost done!
Now for some finishing touches. You can now focus on facial features/hair to the head. Add details to the costume and start to work on the shading to give it a more realistic and three dimensional look and feel.
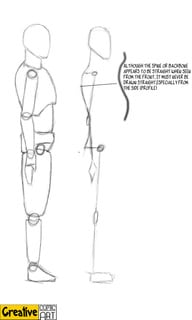
Note that when drawing poses, you must remember that the spine/backbone or any part of the human body is never straight even when the figure is standing straight. Drawing a straight spine/backbone is one of the most common mistake made by beginners. Another thing to take into consideration is the versatility or fluidity of the human body.
Here are some poses you see in most comics these days. Stick figures are used instead of a fully drawn figure so that you can see these poses in its most basic form. Afterwords, once you have gotten more familiar with this technique, you can improve on it however you like.
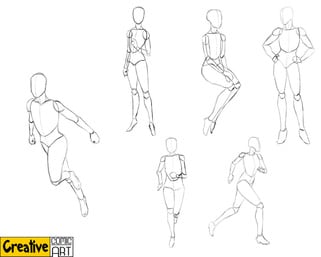
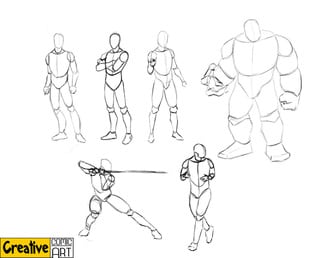
Stick figure works well with most proportion.Don’t forget the difference between male and female figure- check it out HERE.
Drawing A Human Figure
Anyone can learn to draw with the correct instruction. It is the personal style that emerges afterwards that makes drawing human body stances comical, dramatic or active. If you are intrigued with pursuing a career in drawing or just as a hobby, sharpen your pencil and get ready for your first lesson. Having a professional artist at your side will also help and give great tips in the areas of balance, lines and shading. An excellent book by Giovanni Civardi titled Drawing Human Anatomy is a great reference book to have on hand. Now let’s get started. This lesson will involve the head and the upper torso.
Drawing The Head
Being able to draw a face naturally is a skill that most comic artist have, and it is also something that beginners should learn to do.Drawing faces isn’t all about drawing it as realistic or believable as possible, but you must also be able to draw the face consistently so that other will recognize it every time you create them. Be sure to do a standard character development or basic profiling of the character you are about to draw. This will not only act as an objective for your drawing but also helps you avoid straying from what you are planning to draw. For more on Character Creation click HERE.
Similar to drawing the body figure, the head also has its own proportion called – facial proportion. The reason is that the facial proportion is to help you with the facial feature placement and avoid the mistake (or habit) of making the eyes too close or the nose too big.Understanding the basic of facial construction and proportion can help you achieve realism when drawing the head.
The Head Structure
The most important part of the head structure is the feature placement. Once you have drawn the outline of the head, you must first determine the center of the face. Draw a straight line vertically (from top to bottom).This is to make sure that the facial feature is aligned properly in the middle.You can now start placing line to indicate where the facial feature should begin. This starts from the top which is the hairline, the eyes, the ears, the nose, and the mouth.
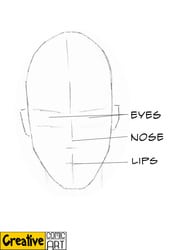
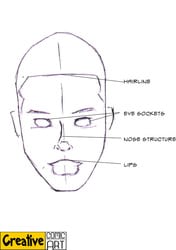
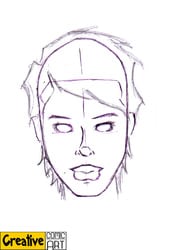
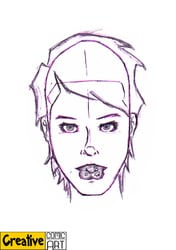

When you are done with the placement, you can begin to sketch out the facial features using soft strokes. The top of the ears should be at the same level with the top of the eyes.As with the eyes, it should be one eye apart from each other. The nostrils can start at the same level of the end of the ears with the mouth just slightly below it.
The Loomis Method
This method is a great way to understand the basic form of the head and especially those who have trouble when drawing the head at different angle. We recommend the Loomis method for beginners because it is a very easy and simple way to construct the the structure all the way to the facial features.
It can be quite difficult to draw the head structure when you are trying to draw them through all the details and even more complicated, trying to draw them in in different angle. Andrew Loomis created a method (some called the Loomis Method) that simplifies the head structure in basic form. The first is a sphere for the cranium and the second, a block that represent the jaw and cheek bones.Check out the videos below on the process of using the Loomis method.
The Cranium (Sphere)

The cranium is the main structure of the skull. The cranium protects the brain and holds most of the facial structure like the eyes, eyebrow, nose, and the ears.To put it simply, the skull without the mandible (jaw bone) is a cranium.
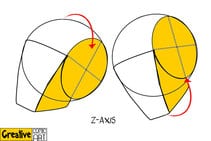
In the Loomis method, it is put in a simple for which is a sphere.But because the side of the head is flat, the sides of the sphere is cut off to represent this. The area that was cut will still look like a full circle in profile (side view) but at any other angle, it will look more oval-shaped with the sides that has been cut being less visible and is viewed from different perspective. Divide the oval area into quadrants. The horizontal line indicates the the brow line, while hairline is set at the top line of the oval and the nose at the bottom end of the oval. See image for example.

Mandible (Block)
The mandible provides structure for the chin and teeth. The mandible completes the skull when put together with the cranium.Facial structure that the mandible holds include the mouth, cheek, chin, and the jaw line. A block is now used to represent the mandible and is attached to the sphere.The top end of the block is attach to the brow line of the sphere.
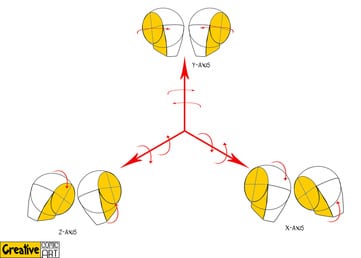
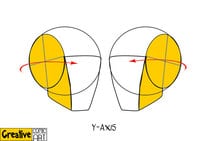
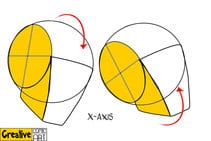
Different Angles
The angle of the head should be determined at the beginning of drawing the sphere. Here are some of the axis that affects the angles that you are going for.
Dividing The Face
After you have established the angle of the sphere (cranium) and added the block (mandible),it is time to divide the face into three section.First is from the the hairline down to the eye brow.You will notice that the hairline is aligned with the top of the oval.Second is from the eyebrow, which is aligned to the middle of the oval, to the nose just under the ears and the third is from the end of the nose down to the chin(which is about the same length of the other two section).See image for example.
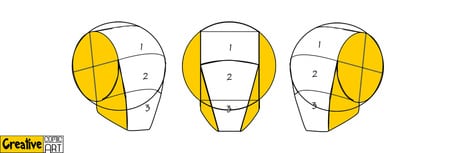
The most common mistake beginners make with using this method is to make the third section which is around the jaw/chin section longer that it should be.The length of the third section that ends at the chin is similar to the length of half the oval shape.The length changes depending on the perspective you are doing.
Now that you have the proper head structure established, it is easier to add the facial features to the head.
Recommended Books
Drawing The Human Head by Burne Hogarth
Although taking a formal course of study in human anatomy will give you greater depth in drawing the human head as far as proportion is concerned, this book does go into more depth than a course would in terms of facial features.Content is limited in breadth, but goes into good depth on multicultural features and aging.
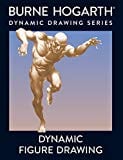
Dynamic Figure Drawing by Burne Hogarth
This is a must buy book for artists, animators comic book artists, or enthusiasts of figure drawing, who have dreamed of drawing foreshortened human figures and human figures in action from memory/imagination. This book doesn’t contain realistic anatomy, the author uses his own version of human anatomy to explain his methods and principles, these have to be taken as tools only and not rules. But after you have practiced from this book hard enough you will find that your life drawing speed and skill is miles further than when you started, I also recommend the other books by burne hogarth, dynamic anatomy, drawing dynamic hands, dynamic heads, dynamic light and shade and dynamic wrinkles and drapery. Only one word of caution its very easy to get influenced by burne hogarths work, and your work might start looking like a clone of his .So the key is get inspired not influenced, keep your own style and use this book to add to that.
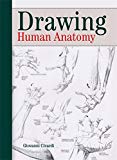
Drawing Human Anatomy by Giovanni Civardi
Why is this book simply the finest reference book on human anatomy, you ask? Simple! Because it clearly and succinctly itemizes the various muscle and bones structures of the human body. It is detailed enough so that even the most experienced artist will find this reference material useful, yet it only emphasizes the details that are relevant to the artist so that even a novice can use this book. You simply cannot find another book on the market that itemizes the human anatomy in such a succinct and useful manner! Beware: this is a reference guide of the human anatomy – that is, it does not “teach” how to draw the human anatomy. For beginners, I strongly recommend pairing this reference material with a book that teaches the basic techniques of drawing the human anatomy.
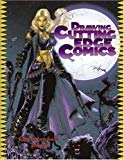
Drawing Cutting Edge Comics by Christopher Hart
I have almost every single book on comic book art written in the last ten years, and this one tops them all. By far.
I recommend this book not only to people who want to be comic book artists, but also those who are interested in more “serious” art forms. The tips and tricks are indispensable for anyone drawing the human form or face, regardless of the style.
I’ve read this book a hundred times, and I still use it every day for reference.
We thank our friends at AmericasPokerBonusCode.com for supporting CreativeComicCart.com. Read their review of the Americas Cardroom Poker download here.
Submit your review | |
I can draw a character wayyyy better by using this base