Contents
The Eyes
The eyes are often the most difficult part to draw when drawing a face. If you think about it, the eyes are what give a face life. Your eyes can tell how you are feeling. They can give you away if you are lying. If you want a drawing of a face to look realistic then you have to get the eyes right. Learning how to draw eyes can take time. You will need to be focused and to take your time in learning how to get the details right so the overall eye looks like it has life, which will bring life to your whole drawing.
Principles to Keep In Mind
When you begin drawing eyes, you need to focus on some basic principles. You will need to think about the shape, size and details. You need to be able to capture all the little details that will show age, emotion and other properties. You also need to think of each eye as an individual thing with its own quality. You should avoid trying to draw every eye the same. Use a picture to start with. You need to look at how it is shaped and the variations of the eye. This is what will help keep your eyes looking real and not flat.
Difference Between Male and Female Eyes
It is also important when you learn how to draw eyes that you think about whether your subject is male or female. Male and female eyes are very different. You need to capture this in your drawing. Male eyes will have a heavy, low brow with distinguished bone structure. Women’s eyes have a somewhat thinner brow.The eye brows will be arched and less winged. They are not as pronounced as a man’s eye.
Basic Eye Structure
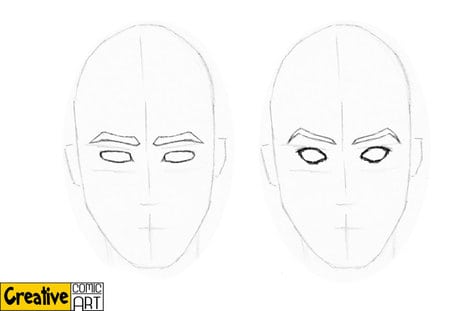
When you are beginning to learn how to draw eyes, you will want to create the eye socket on the face structure first to give you a basis for your eye. Sketch out the socket, creating the amount of bone definition needed. Make sure it is the right size.
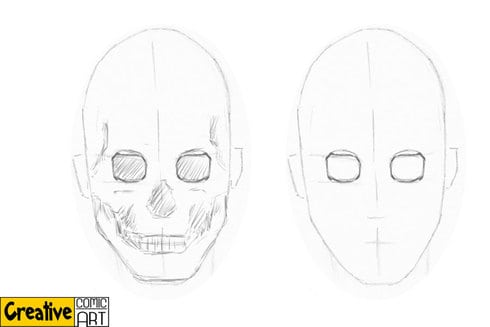
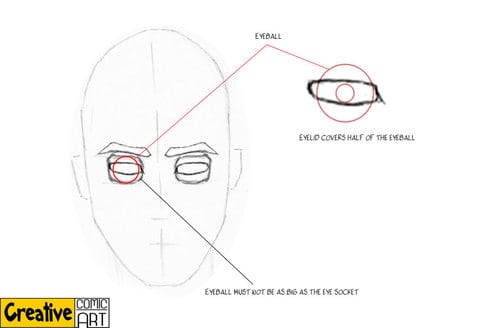
The eyeball is basically a sphere object in each eye socket in the the skull. There is no need to draw a perfect circle for the eyeball because most of it will be covered by the eyelid. The iris,pupil, the features of the eyelid as well as the definition around the eyes is what we will be concentrating on. The eyelids covers some part of the eyeball, leaving the iris/cornea area visible.
Eyeball Details
The pupil is a hole or an entrance on the iris where light enters. Both the pupil and the iris is underneath the cornea.The most overlook aspect of both the iris and the cornea are the shape or contour.The iris has a slight concave shape towards the eyeball, while the cornea has a more convex shape away from the eyeball.Because the cornea is transparent, the only visible part would be the highlight. The iris however, is shaded as normal.

The Eyelids
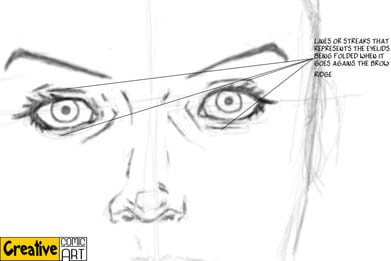
When drawing the eyelids, many would make the mistake of making the eyelids covered with eyelashes, altogether eliminating the visibility of the eyelid (most of the time this happen is when you overdo the eyelashes). Though it is true that eyelids are not visible from a distance, a lot of people (beginners mostly) continue to do this even when they draw it up close.
When the eyes open, the eyelids becomes folded as it goes against the structure of the brow ridge. When this happens, you can see a line between the brow and the eyelashes.
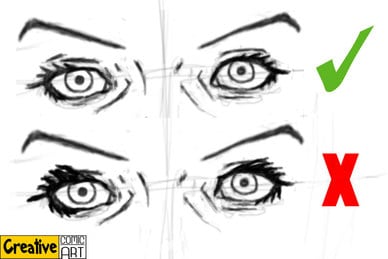
Instead of drawing individual strand for the eyelashes, simplify it by drawing them in clusters (do not emphasize more on the eyelashes if you are drawing male eyes).
After this is done, you can then add the fold of the eyelids by adding details on the outline of the eyeball.
Though it is true that eyelids are not visible from a distance, a lot of people (beginners mostly) continue to do this even when they draw it up close.
As you draw in the eyeball, iris and other features of the eye, you will need to pay attention to the details and add depth to bring the eye to life. Avoid making the eye flat, which is the common reason why people have so much trouble drawing eyes. Draw in the curves and draw in the separation of the eyelids where they meet the eyeball. Pay attention to detail for the perfect drawing.
One last tip that can be helpful when you are learning how to draw eyes is to study the anatomy of the eye. Understanding the subject will make it much easier to draw. Look at pictures of real eyes and note the details. Do not avoid the sections that gives you trouble, instead practice drawing even more on it so that they won’t be much trouble for you in the future.
The Nose
The appearance of the nose changes the most when it is viewed from different angle compared to other facial features. It can be quite tricky when drawing the nose especially from different angles, but the basic structure of the nose is the same as any other facial construct. The most common mistake made is to make draw the nose by starting at the bulb area of the nose, and ignoring the foundation or basic structure of the nose. This can make your drawing of the nose look awkward (unrealistic) and out of place (hanging).
Basic Nose Structure
One thing to keep in mind when drawing the nose is to always better to place the bridge of the nose first. This is because the bridge of the nose is the foundation of the nose structure, which consists of cartilage that forms into the skull opening for the nose.Therefore, it is recommended that you start with the nose bridge ,work your way to the tip of the nose, and finish up at the nostrils.
The nose consist of four basic planes, this can change to only three depending of the angle you choose to draw the head. It is important to get the proportion of these planes right so that the size of the nose can fit the rest of the facial features properly.
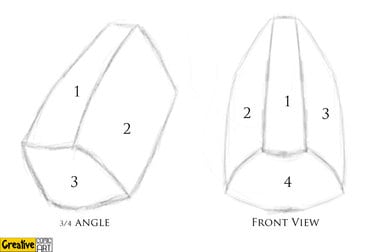
Major nose planes changes to 3 at different angle.
Once you have the placement and the size correct, you must now set the smaller shapes.Similar to the shapes used for the basic structure, the smaller shapes are used to get the details and add outline to establish the features of the nose.
Now,the shape of the nose is starting to come together. It is time to add the finishing touches. Continue to outline the shape of the nose but this time with darker strokes and only the ones that can be seen depending on the light source.Click here for more on lighting. Once that is done, start shading the nose to give it a sense of realism.
That was drawing the nose from a frontal view. Now try drawing the nose from a different angle using the 3 major planes as the basic nose structure.
The Mouth
When drawing the mouth, people often make the mistake of thinking that the lips forms up on its own. The reason most lips have their own shape is because it actually wraps around both the upper and lower set of teeth.The function of the lips are comparable to that of the eyelids (which wraps around the eyeball). But instead of the upper lid doing most of the movement, it is the lower portion of the mouth that does most the work because the lower set of teeth is attach to the jaw (mandible). Whenever you speak or eat, the movement of the jaw effect the lower portion of the mouth.
The best way to draw the mouth is by using the inflated cylinder shape as the basic structure for the tooth cylinder. Create a line horizontally to act as a separation for the upper and lower lips.
Drawing with this method is by far the easiest way in getting the shape and position of the mouth correctly. Similar to drawing with the Loomis method, this method also allows you to draw the mouth at different angles.
The lips have five basic form that makes up for the fullness of the lips. The upper lips has three while the lower lips have two. When drawing the lips from different angle, these forms will help show the overlap effect of the lips. The overlap, when done properly, can add the illusion of depth in your drawings. Combine the five basic form and the inflated cylinder shape basic structure (plus a lot of practice), You will have no problem drawing the mouth from any angle.
Teeth
The most common mistake when drawing the teeth is to draw out each and every tooth visible. It is true that the teeth individually formed, but drawing the small shapes in can be difficult and if wrongly done, can lead to a very different facial expression. When drawing the teeth, it is best to keep it simple. You can do this by drawing the gum line that is visible to suggest that the teeth has its own form but not in detail.You can also draw out some lines on the teeth to give it a tiny bit of detail, but do not over do it.
The Ear
By now, you could easily figure out the placement for the ears.It is even easier to figure it out if you are using the Loomis method. Just make sure that the top of the ears are aligned with the eyebrows and the bottom of the ear aligns with the nose. In profile(sideview), it is placed near the starting of the jaw. The details of the ear can be quite difficult to draw and although you will not notice it at a distance, it is helpful to know how to draw the basic “shape” of the ear.
When drawing any part of the body, it is best that you start with the basic shapes. The ears are no exception.Instead of drawing the basic shape or form of the ear, the easiest way to draw the ear is by using the question mark (?) and the letter “y” as its basic shape. The question mark (?) is used for the outer shape of the ear, while the “y” shape is used on the inside of the ears.
The Up and Down in Perspective
Like all other facial feature, the position of the ears are effected when viewed from different angles. But because the ears are at the center of the face and is aligned with a couple of other facial feature, the only angle that you should be careful with is when the head is facing up or down. If the head is facing either up or down, the placement on the ears are usually on the opposite side of where the head is facing.
For example, if the head tilts downwards, the ears are placed higher than the head. If the head faces upwards, the ears are placed lower than the head.
Drawing A Human Figure: Drawing Human Shoulder and Hands
With the torso and head now taking shape it is time to move on to drawing other parts of the body. Unlike the head and torso that are responsible for housing internal organs, the shoulders, arms and hands are limbs that contain muscles and nerves to carry out commands.
Drawing human shoulders that respond to movement requires a different approach than the torso and head. Circles or balls more adequately relate to action as opposed to squares that resemble hard shells for protection. The shoulders, arms and hands contain a type of ball that fits into sockets at the shoulder blades, elbows and wrist. Think of a movable part when starting this part of the body.
After learning how to draw the basics of the shoulders, arms and hands, Drawing Hands Feet: Form, Proportions, Gestures and Actions by Giovanni Civardi can further your expertise in creating different types of poses that require active use of the arms.
Drawing Human Shoulders
1. Draw a large circle on the upper edge of the torso, keeping the top of the ball shape a little higher that the torso. Because the arm is hard to see and work with while flat against the body, we will first draw the arm pointing straight out from the torso at a 90-degree angle.
2. The shoulder is still not straight across but slants slightly until it reaches the ball. Using your own arm, hold it straight out and feel how the ball rises above the shoulder. There is very little space between the neck and the shoulder joint but enough that a sloped line needs to be drawn.
Drawing Arms
3. The length of the arms needs to be measured in proportion to the body. Normally, the elbows rest along the waistline and the bottom part of the arm is about a fist shorter than the top half. Draw a flat oval shape for the top part of the arm and stop at the same distance as the top of the torso to the waistline.
4. Make a ball for the elbow and continue with a second flat oval shape for the bottom half of the arm, making it a fist shorter than the top half. Draw another ball for the wrist.
5. The muscles are what adds dimension to the arms and a good comparison is that of a braid. A braid is not smooth but has triple knots all the way around. Pretend that you are wrapping a thick braid around your arm beginning at the wrist, wrapping once at the elbow and ending at the shoulder.
6. You will need to practice smoothing out the bumps but pretty soon your balls and ropes will begin to resemble a straight arm.
7. Once you have the ritual down, draw the other arm along the side of the torso.
Drawing Hands
8. Draw a rectangular box for the palm with sticks for fingers and thumb. The simplest way to form the meaty part is to use your own hand as an example. Notice that none of the fingers are the same length and the thumb will always seem out of place.
9. Practice on the shape of the hand by holding your own hand straight out with fingers apart. Draw little circles for knuckles and a larger ball at the base of the inside thumb.
10. The length of the hand should rest at the middle of the thigh (after the thigh has been learned). Fingers have different lengths but the middle finger is usually a good basis for the lengths of the others. If the middle finger appears too long, the others will follow.
11. Hands come in all types of sizes if you stop and study them. Most correspond with the size of the shoulders. Keep this in mind when rounding out the shoulders in relationship to the hands.
When you have the entire arms, complete with shoulders and hands completed, they may appear a little awkward. It will take practice to get the size and creases to perform to your liking. The hands may be the most difficult to master. An excellent book for reference is Drawing Dynamic Hands by Burne Hogarth. How to understand the movement of hands is discussed so action will become second nature in your drawings.
Recommended Books

Drawing Cutting Edge Comics by Christopher Hart
I have almost every single book on comic book art written in the last ten years, and this one tops them all. By far.
I recommend this book not only to people who want to be comic book artists, but also those who are interested in more “serious” art forms. The tips and tricks are indispensable for anyone drawing the human form or face, regardless of the style.
I’ve read this book a hundred times, and I still use it every day for reference.

The Book Of A Hundred Hands by George B.Bridgman
This is a fantastic resource for any artist wanting to understand the human hand. Bridgman breaks down the hand to basic shapes and then builds up to the rendered hand showing you along the way how the bones, muscles, tendons and veins relate to the overall shape of the hand. I highly recommend any of Bridgman’s books for a better understanding of drawing the human body.
Drawing Hands & Feet: Form, Proportions, Gestures and Actions by Giovanni Civardi
This book is a must’ve have for anyone wishing to get in-depth help for drawing hands and feet. These two areas often have artists a bit stumped, especially in particularly dynamic poses which cause foreshortening.
Clear instruction complemented with beautiful drawings should have you drawing better hands and feet after usual practice.
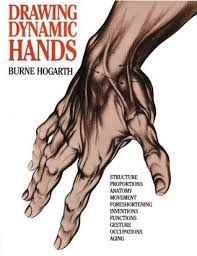
Drawing Dynamic Hands by Burne Hogarth
I’ve been really struggling with learning to draw hands. The best help so far was Bridgman’s, but I was having serious problems nonetheless. However, this book by Hogarth kept coming up whenever I looked at reviews and recommendations. I’d been avoiding the book — I love Hogarth’s illustration style, but I wondered whether it would be a serious art instruction book. Feeling a little bit guilty, I decided to look at it at a local bookstore before buying it at Amazon. I spent about five minutes reviewing some of the key concepts.
Bottom line: I made more progress on drawing hands in that one evening than I had in the previous week. I ordered the book that night. In order to qualify for super-saver shipping, I also ordered “Dynamic Wrinkles and Drapery” also by Hogarth, and it was an excellent purchase as well!
Submit your review | |