Drawing The Body / Torso and The Arm
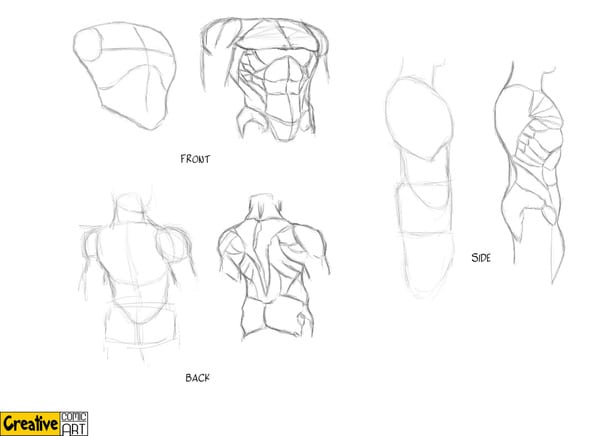
When drawing a figure, it is best to know where the “landmarks” are. “Landmarks” are areas where a certain checkpoint can be set based on physical attributes of the body (in the case of figure drawing, bones that protrudes and is visible on the body.) If you touch your shoulders now, you will notice that the bone connects to your collarbone (clavicle) which is one of the body landmarks. The best way to use these “landmarks” are by connecting one to the other (in which we will show later). “Landmarks” are also used to measure the distance of one body part to the other. Here is a list of “landmarks” that is visible from the front and back of the body.
The front –
- The clavicle (collarbone).
- The top end of the shoulder where the clavicle connects to the scapula.
- The lower edges of the rib cage and sternum.
- Both end of the ulna and radius (wrist and elbow).
- Sides of the pelvis (hip bones).
- The knuckles.
- The patella and tibia (knees).
- The tibia and the fibula (ankles).
- Toes.
- The tibia and the fibula (ankles).
The back-
- The area where the spine connects to the rib cage.
- The edges of the scapula (shoulder blades).
- Both end of the ulna and radius (wrist and elbow).
- Sides of the pelvis (hip bones).
Drawing Out From The Landmarks
From the “Using the head count method” page, we have already discussed the proper measurement and proportion of the figure by using the size of the head. But drawing the human figure using this method can be time consuming. With the help of “landmarks” you can minimize the amount of work you do when you are figuring out the width/length or the distance of one body part to the other.
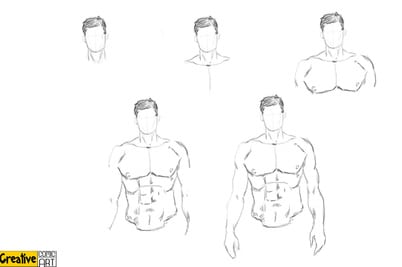
It doesn’t matter if you are new to drawing the human figure or not, it is always better to draw your figure from the inside and working your way out. It is not only easier and faster, but it also changes your drawing approach to be more versatile. This can also help you avoid making the head count method as a “crutch” and begin drawing with as little guide as possible. The reason we recommend drawing from the inside out is because many tend to make the mistake of finishing the outside line before even starting on the main body part that it is attached to and ultimately running into the problem of not being able to fit in other body part due to lack of spacing.
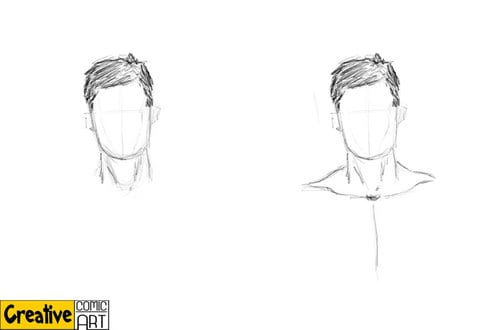
To draw using the landmark, first start off by drawing the head and the neck. The use of landmarks start just below the neck, at the center of the clavicle. Keep in mind that the male neck is thicker than the female neck, which in a way makes it longer even when it is the exact same length. To see the difference in male and female body shape, click HERE.
From here, draw the rest of the edges of the clavicle. The clavicle line that connects to the shoulder must never be straight. If you see your own clavicle (collarbone), you will notice that it curves slightly upwards. Draw the center line of the chest all the way to the sternum.
At the end of the center chest line, continue drawing the rest of the chest. The nipples are aligned about the same as the end of the clavicle. Once this is done, continue with the shoulder from the clavicle line that connects to it.
For female figure, draw up two circle on top of the chest to represent the breast before you draw the nipples.

Now, instead of continuing from the shoulder to draw the rest of the arm, we will go back the finishing the rest of the torso first. This is to ensure that you have enough space to draw the torso and is not interrupted by the shape of the arm. This is also for you to have better placement and enough space for the arms.

From the end of the chest, draw out the rib cage starting near the armpit. Afterward, draw a rough center line to the navel and all the way down to the crotch area. Around the center line (below the ribcage) and the navel area, you can outline the shape of the abdomens (abs) a little, just to show some muscle definition.
Try not emphasize too much muscle definition for a female figure unless you are aiming for a superhero or a ripped female body builder like figure. If you emphasize too much muscle detail on a female figures, there is a probability of them looking less feminine.
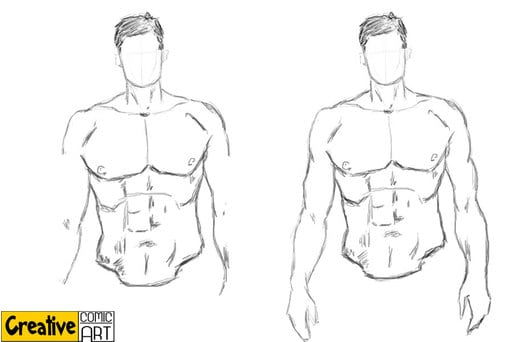
With the torso in place it is time to move on to drawing other parts of the body. Unlike the head and torso that are responsible for housing internal organs, the shoulders, arms and hands are limbs that contain muscles and nerves to carry out commands.
Continue back to drawing the arm and starting from the shoulders landmark to the elbow landmark. Drawing human shoulders that respond to movement requires a different approach than the torso and head. Circles or balls more adequately relate to action as opposed to squares that resemble hard shells for protection. The shoulders, arms and hands contain a type of ball that fits into sockets at the shoulder blades, elbows and wrist. Think of a movable part when starting this part of the body. Finish the arm by continuing from the elbow all the way to the wrist landmark.
When you have the entire arms, complete with shoulders and hands completed, they may appear a little awkward. It will take practice to get the size and creases to perform to your liking. The hands may be the most difficult to master. An excellent book for reference is Drawing Dynamic Hands by Burne Hogarth. How to understand the movement of hands is discussed so action will become second nature in your drawings.
Another book called Drawing Hands Feet: Form, Proportions, Gestures and Actions by Giovanni Civardi can further your expertise in creating different types of poses that require active use of the arms. You can also practice using landmarks on stick figures and work your way similar to what was mentioned above.
Drawing the Legs
The reason we separate the the arms and the legs from the torso is to show in details of how to draw these body parts and how to make them work in different angle. If you a fine with drawing the whole figure without any problem, then please continue to do so. One of the most common mistake when drawing the arms or the legs is to draw them too long or too big. But these mistake are also done by comic artist professional. The only difference is that they do not stress too much about it. They just erase, and start back, but most importantly they do not repeat the same mistake.
We will continue where we left off at the end of drawing the torso, which means we will still be using landmarks as guide. We will start drawing the legs near the pelvis area. Drawing the legs can be seen as two parts – the first part is from the groin area to the knee and the second part is from the knee all the way to the feet.
It is easier to draw the first part of the legs with the help of sartorius muscle line. The sartorius muscle is a long thin muscle in the thigh that in a simplified manner, goes from just below the pelvis to the knee. Use this muscle line to help out getting the basic muscle definition of the leg. By drawing this line, it will create simple muscle definition at the same time giving the leg a more natural and realistic look. You can end this part of the leg at the top end of the kneecap.
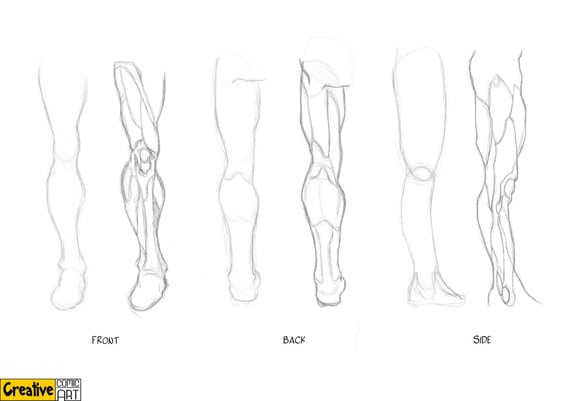
The second part start at the kneecap or patella. Start by drawing out the detail of kneecap. The size of the kneecap is around half the size of the thigh. You can then outline the rest of the leg up to the ankle or the top of the feet area. This is where most people have problems with when drawing- the feet. In most cases, especially in comic art, the characters are drawn with footwear on. You do not get to see much of the feet. But it always helps to know the shape of the feet and how it works.
Legs and feet can be drawn as active, still, comical or just bizarre. A basic understanding of the shape and proportion of the hips, legs, knees, ankles and feet are important in whatever stance you are trying to achieve. Once you follow the simple steps on how to draw legs and how to draw feet, creating thin, fat, short or long legs with matching feet, you will be able to portray a more realistic looking body.
There is a lot of deviation that can be used in the muscular tone and thickness of drawing legs. An excellent book for becoming a pro at understanding and drawing physical movements is Drawing Hands Feet: Form, Proportions, Gestures and Actions by Giovanni Civardi. Together with shading, you can learn how to put action to your feet and legs.
We thank our friends at Planet 7 for their support of CreativeComicArt! Get the free Planet 7 Casino download here and play for free or real money. Find more of the top free downloads at PokerCasinoDownload.com.
Submit your review | |